

So let’s say you’ve been reading my Substack posts and have decided that you want to start up a self-sufficiency garden, and could use a little guidance. Or maybe you’ve already been growing your own vegetables for some time but aren’t sure how what you do differs from what I advocate. Eventually, I’ll offer an online course on how to either start or transition to an s-s garden, but in the mean time I thought it would be useful to lay out the basics.
The value pitch
The first step is to ask yourself a couple basic questions: 1) Do you like the idea of being able to eat only from your garden—should you decide to—for an extended period of time, whether it’s a day, a week, a month, or up to a year? And 2) Would you like to get a nutritionally balanced diet from your garden? Contrary to what you might think, the usual home garden features only watery vegetables (compared to dry shell beans and dry dent or flint corn) that, while high in minerals and vitamins, are low in protein and energy. That’s not a balanced diet, and thus would not sustain you for long. Hence the need for most gardeners to rely on higher-calorie items at the grocery store.
Not that you have to be ideological about what counts as self-sufficiency. Do you like condiments like salt and pepper, olive oil, cinnamon, or maybe a little parmesan cheese sprinkled on homegrown tomato sauce over a plate of spaghetti squash? I do. Besides, I don’t expect anyone to jump to an all-garden diet overnight, or even at all if they’re used to and like meats. Changing gradually and to whatever degree you’re comfortable with is the rule here. It’s the fundamental premise that’s key: not being existentially dependent on the grocery store to meet your food needs. Even more important is deriving the self-empowerment, satisfaction, and re-connection to the earth, yourself, and others that comes from taking deeper control (literally, from the life-giving soil) of your life. Does that sound good to you?
If it does, and if you’ve never had a food garden before, I suggest you start with a modest 1.5’x7’ plot. The immediate goal is to be able, toward the end of the growing season, to enjoy at least one whole day of eating only from your garden. Then, if that brings you benefit that has meaning for you, so that you want to continue it for a longer period of time, say a couple weeks’ worth of food the following year, or even just now and then, you can expand your efforts proportionally. Actually, even with a 2.5’x7’ plot, you’ll probably get a good bit more than just one day’s worth of a balanced diet. Would you be okay with that?
The garden
First, you need an area that gets at least 5-6 hours of direct sunlight a day, preferably around the middle of the day. Second, it should be a spot that doesn’t stay waterlogged for a day or two after a heavy rain; it needs to be either on a higher level in your yard, or drainable (e.g., by a small ditch) in some way. Overall, your plot should be a 1.5’x7’ bed surrounded by a two-foot border, so you have room to walk around it while still inside a 5.5’x11’ fence. (The graphic is for illustration purposes, not to scale.)

Below is a little more detail on the overall plot, divided into 1.5’x2’ subplots. You’ll have only one plant each of winter squash, potato, greens, and tomato, and two each of corn and beans, about 4-5” apart. You may want to plant the winter squash and sweet potato, which will send out vines, at the ends so they have room to wander about. You can arrange the rest of them in any order you like.
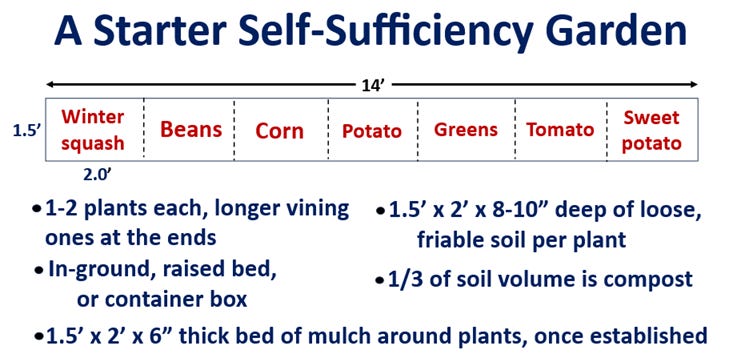
Each subplot should have loose, friable soil measuring about 1.5’x 2’ x 8-10” deep. It can be either dug up from within the existing ground, scooped up somewhat above the ground level but without enclosures, or with soil added to produce raised beds within a wooden frame or other border. There are pros and cons for each of these options. I prefer in-ground with enough compost added to build up a 4-6” raised bed. Enclosing raised beds requires constructing or buying the enclosure and then sourcing and adding 8-10” of good quality topsoil. It’s a significant added expense, but many people favor it. As for soil fertility, to avoid having to do soil tests and then figuring out how to adjust fertilizer and pH, I suggest just mixing in enough good-quality compost to comprise about one-third of the soil volume. Of course, finding adequate compost (well-decomposed organic matter that is more or less loose/powdery, chocolate-or-darker brown, and fresh-smelling) can also be a challenge, but at least you won’t run the risk of over-fertilizing your plants with chemicals.
And finally, once the plants are well established (i.e., sufficiently high enough and strong not to get easily covered up), it’s a good idea to apply about 6” of mulch that’s thick and dense enough to prevent the growth of weeds (but don’t use wood chips—too easy for weeds to find their way through). This goes for not only around the plants themselves, but also in the two-foot border around the outside of the plot but inside the fence.
Plant varieties
The table below summarizes my suggestions; I have just a few additional comments.
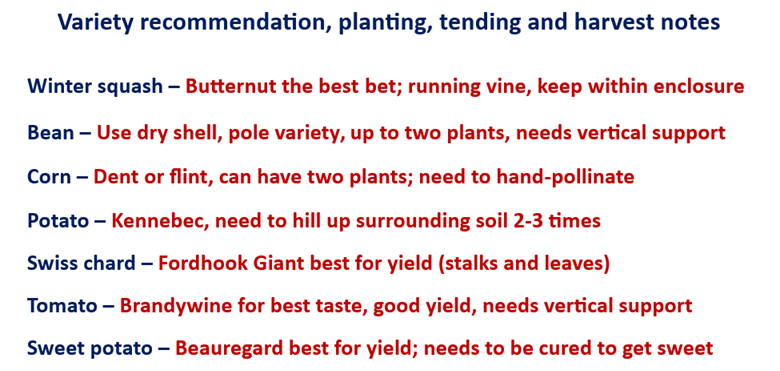
Winter squash: Several favorites to choose from, but it’s a challenge to protect many of them from squash vine borers. Butternut is not only immune to the borers, it yields and usually keeps well, and has very good flavor.
Beans: Here I mean varieties that are allowed to mature until dry and then be shelled, not green beans. Dry beans are where you get most of your protein from the garden.
Corn: Sween corn is great, but for protein, energy, and easy storage you want what’s called dent or flint varieties that are allowed to mature into dry kernels. Seed catalogs describe them as suitable for grits and cornmeal. Corn requires a little extra nitrogen and hand pollination, as you’ll have only two plants. See the two references I mention below.
Potatoes: These have to be planted as “seed potatoes”, pieces of potatoes that have at least two “eyes” that grow into shoots and then whole plants that bear tubers underground. Kennebec is a good choice, but there may be others—maturing early, midseason, or late—that you may simply prefer.
Greens: Swiss chard is the most versatile and easiest to grow, but kale gets a lot of publicity for its excellent nutritional value. Easiest to plant pre-started seedlings.
Tomatoes: The varieties you get at Wal-Mart will grow, but the flavor is about as disappointing as your average grocery store fare. If you have a local farmers market where you can get heirloom (e.g., Brandywine or Chef’s Choice) starter plants, the taste is far superior.
Sweet potato: Here, you plant what’s called “slips”, seedlings with just a few young leaves and roots, available from the larger seed catalogs and nurseries. To get the sweet taste, you need to either keep the harvested sweet potatoes for a week or 10 days at a temperature of 85oF, or store them several weeks at 55o. I’ve found Beauregard to yield and keep very well.
Supplies and equipment
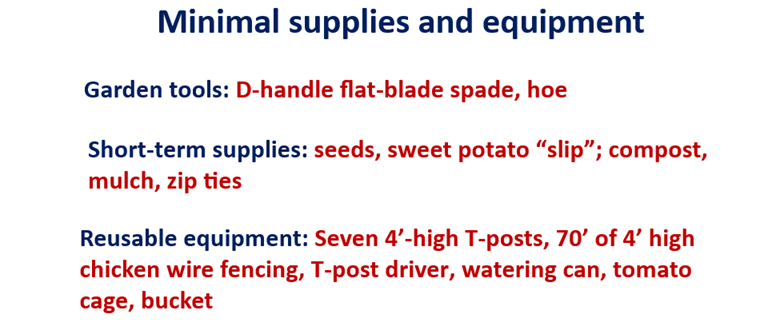
As indicated below. The most important tool is for digging. I recommend a spade with an 11” long by 8” wide, flat-blade and a D-handle. It’s the best for preparing an in-ground bed, but you’ll most likely have to order it (about $65). Some people prefer a more conventional convex-bladed shovel you can get at the hardware store. In my opinion, the cheaper price of a shovel doesn’t justify the extra effort it requires. Whether you go with a spade or shovel, a hoe is also useful; not so much for weeds, which with properly applied mulch will not be a problem, but to pull fluffed-up soil/compost mix back into a dug-out garden bed, as you will presently see.
Short-term supplies consist of things that need to be replaced each year, minus any seeds and seed potatoes you’re able to save. You can grow your own sweet potato slips from saved sweet potatoes that have sprouted shoots over the winter, which you can place in water about a month ahead of planting. By that time they will have produced plenty of roots and leaves, so all you have to do is stick them in the ground.
Unless you live somewhere that has absolutely no deer or rabbits, you’ll need to put up a four-foot high fence. This means purchasing seven 5.5’-long, sturdy “T-stakes” and setting them into the ground with a T-stake driver (available at home-improvement and some hardware stores). The positions of the T-stakes are indicated by the red dots in the upper-most illustration, which also includes the location of a rabbit-proof gate. The fencing itself should be standard “chicken wire” with one-inch hexagonal openings to keep out even baby rabbits. Since chicken wire usually comes in two-foot widths, you’ll need to fasten one above the other to the T-posts (with zip-ties). A watering can is sufficient for watering a small garden like this, and for the tomato plant, a sturdy, four foot-high cage of some kind is handy. Or just drive a 5’ wooden stake into the ground and tie the main stalk up (while pinching off most of the axillary shoots, with either type of support).
Bed setup
Once you’ve located a sunny, reasonably well-drained location, the most common of which will be a lawn, you have to decide whether to do a raised bed—within an enclosure or not—or an in-ground bed. A raised, enclosed bed is easy, if not cheap, assuming you are able to build the enclosure yourself or buy one, and can find a source of healthy topsoil (i.e., not scraped off some chemical-drenched agriculture field) to fill it to at least 8” deep, with about a third of the volume consisting of compost.
Not so easy with the boxed-in raised-bed route—if you eventually want to grow a year’s worth of food—will be multiplying the boxes to enclose 720 square feet of beds in a 35’x40’ garden. Even with placing every two 1.5’-wide x 40’-long beds adjacent to one another, that would require about 500 feet worth of 8”-high wooden enclosures (or 4-6”-high, if you don’t mind scrimping on yields), plus 1,200 cubic feet of added topsoil (at 8” deep; 600 ft3 at 4” deep). Just say’n. But maybe you’d be happy with some fraction of that goal for the time being.
For an in-ground starter garden, first mark out your 1.5’x14’ plot with string pinned to the ground, then make 4”-deep incisions along the string all the way around, preferably with your flat-blade spade. Then, kneel down and slide the spade under the sod, gradually prying and lifting off partial pieces of it and setting them aside. Then, while applying pressure to the top of the blade with your foot, dig out a little soil at a time until you have an initial hole 1.5’ wide by about 6” front to back and 8-10” deep. Gradually, taking off 1”-thick slices at time and setting them aside, extend the hole—at the designated width and depth—front-to-back until you have a trench 7’ long. Then mix the compost and soil evenly while refilling the hole, pulling the mix in a little at a time with your hoe. It will mound up well above the original ground level, rendering a raised “windrow” but without enclosing it in a box.
And by the way, if this sounds like too much effort to do all at once, by all means do just a little at a time. There are also several spading skill tricks you can use to eliminate unnecessary strain on your back, legs, and arms. Namely:
-
Don’t dig if the soil is too wet (sticks like glue to the spade), or so dry it’s too hard (gradually add just enough water to soak down and soften it.
-
Only dig out 1”-thick slices at a time.
-
When lifting out a slice, have one hand relatively close to the blade and the other on the D-handle, pry the blade back toward you using the front edge of the hole as a fulcrum, and lift mostly with your legs. Keeping your non-handle hand too close to the D-handle ruins the leverage and strains you back.
-
If the ground is compacted, you can swivel the blade, again while applying pressure with your foot, either back and forth to the left and right, or push and pull it to and fro to help ease the blade in a little deeper. Do this repeatedly, a little at a time; no need to do it all by brute force, unless maybe you’re a football player with plenty of extra muscle.
-
Gently dice and chop up the set-aside soil with the spade to make it easier to incorporate the compost.
Still sounds intimidating? Then know that at age 73 it took me only about 5 minutes per foot to extend a trench—in a very tough site that had never been hand-dug before—to an eventual total length of 400’. Not all at once, of course. It’s always steady as you go, a little at a time.
Congratulations, your in-ground or raised bed garden is ready to be planted. Because this post is already getting long, I’ll address how to gradually increase a starter garden to larger plots in a separate post. For those who already have a garden, just set aside the space and do a starter as I suggest, and see how it goes. Or otherwise adapt my self-sufficiency criteria as you see fit.
Full disclosure, please understand that this is all just a simple introduction, a primer, not an exhaustive description of all I could say about it. To get the most out of this post, I suggest first reading up a little on each of the suggested plants. My favorite reference books are Steve Solomon’s Gardening When it Counts – Growing Food in Hard Times, and Carol Deppe’s The Resilient Gardener – Food Production and Self-Reliance in Uncertain Times. That said, you’ll see that some of what these books advise differs a bit from what I propose. Besides, there are plenty of other fine gardening books, articles, videos, etc. to consult as well. So try what I suggest and see how it works—gardening should always be a fun and fulfilling experiment.
Above all, get started and have fun. If you’re not having fun, you’re doing something wrong. Let me know in the comment prompt what the problem is.


0 Comments